How do you plan a book before you start writing? There are many books designed to help you. Save the Cat takes patterns of popular screenplays in order to organize your writing. Story Grid offers steps to plan your book based on patterns of bestselling books. Story Genius uses brain science to get into your character’s heads so they can get stuck in your head. Then there are all the tools you can use like notecards, outlines, apps, sticky notes, Scrivener, mindmaps…
With so many options, it can be confusing knowing how to incorporate the different methods and techniques.
Where do you begin? How do you decide which of the various tools and methods to use and which to ignore when making a plan?
I’ve put together this guide that begins with my five-step book writing cheat sheet to plan your book– five steps to remove 95% of the indecision of writing your book. It covers laying out the basics of your book and then organizing and planning your book before you begin to write.
Five steps to plan your book before you start writing
Step One: Write A One-sentence Summary Of What Your Book Is About
When I ask you what your book is about, I want to know what you want your readers to understand and feel when they finish reading your book.
Shawn Coyne analyzed hundreds of popular books and then isolated the patterns he saw to create a tool for writing stories. He called this process Story Grid. What I call an “About,” he calls the Controlling Idea of your book. It’s the meaning of your book and the message you want to send.
When you have a clear view of what your book is about then you can make sure each scene that moves the story forward brings your readers closer to understanding the controlling idea. Share on X
Step Two: Describe Your Plot In No More Than Five Sentences
These five sentences or fewer are similar to a logline in the “Save the Cat,” a screenwriting methodology based on analysis of what makes a popular screenplay. Your logline is a short overview that explains the plot, including stakes, the character arc of your most important characters, as well as the controlling idea.
Yes, that’s a big order. The first time you write a logline for your book you’ll likely find it difficult. That’s generally a sign you don’t yet have a clear idea of what your book is about. You may be trying to shove too many ideas into one story or your ideas aren’t narrowed down enough.
You can start writing anyway, even if you don’t have a clear trajectory for your story. The process of writing can help you figure it out. That said, the more you’re able to plan the story before you start writing, the faster you’ll be able to write your draft.
Step three: Get To Know Your Characters
Once you’ve set the stage for your story, it’s time to populate it with characters. Get to know your characters beyond the basics. Know who they are, what they want, what they wear and how they act in any given situation. The more you understand them, the more you know what they’ll do and how they’ll react when placed in your story.
Kristin Kieffer of Well-Storied offers a whole library of character resources to help you work through everything from developing mentors to crafting villains to identifying your characters’ motivations and appearance, among others.
You can also download her Character Creation Made Easy worksheet by signing up here.
???? PRO-TIP: Your characters will change as you fill out the character sketches and later as you develop your plot. With each step, go back to your sketches to update and tweak. This will keep you in touch with your characters and how they’ll show up in your story. It also helps you remember important details you might otherwise forget.
Step Four: Get Your Ideas On Paper
List all the scenes you want to include in your story and put them in the order of your story. You can achieve this by using notecards or presentation software on your computer. You can also use sticky notes, Scrivener book writing software or anything that allows you to scroll through your scenes in the order you want to see them as well as make changes and updates to the plot.
Use whatever tools work best for you as you plan your book. Let your instinct guide you as you organize.
Once you have your scenes in order, then it’s time to look for plot holes and make sure you answer important questions. Story grid’s Obligatory Scenes lay out the specific scenes you need for each genre. These scenes help you set the pacing of your book as well as create satisfying story arcs that tie up loose ends. The Foolscap worksheet lays out each of the details you need for your story. You’ll define your genre, the character’s desires, your controlling idea and then make sure you have scenes that connect your ideas from the beginning to the end of your story.
Step Five: Organize. Organize. Organize the plan for your book.
In order to figure out which obligatory scenes you need, you need to know your genre. Story Grid has a handy overview and explanation of all the possible genres. According to this system, there are two kinds of genres: Internal and external. Every story includes one of each.
External genre refers to the external conflict that drives the story. Whether your character must save the planet by ridding the world of an evil force, or if they have to find the origin of the family secret in order to reconcile with their mother before she dies, external conflict is the action that moves the story forward.
???? In “The Lord of the Rings,” for example, Frodo will lose everything he holds dear unless he destroys Sauron’s ring in the fires of Mount Doom.
???? In “The Midnight Library,” Nora must make a choice between different potential lives before the clock strikes midnight or she’ll lose her life altogether.
???? In Erin Khar’s “Strung Out: A Memoir of Overcoming Addiction” a heroin addict must overcome her addiction or lose the people who love her most and possibly her life.
In each of these stories, the main character has no choice but to act. They can’t just sit still and wait to see what will happen.
The internal genre refers to the moral journey a character takes over the course of your book. It includes your character’s moral values and desires. When you know the internal genre of your book, you create a deeper level for your readers to follow as they follow the action of the external genre.
The internal genre of “The Lord of the Rings” is Morality, the fight between good and evil in order to find redemption. Frodo fights with the desires the ring brings out in him to keep power for himself. This is in direct conflict with his desire to protect his home and his friends. His moral journey plays out in the last moments of the book when at the last minute, Frodo decides NOT to throw the ring in the fire. ????
Nora’s “Midnight Library” arc moves along the path of a Worldview internal genre. The way she sees the world changes over the course of the book as she decides whether or not she wants to continue living.
The Worldview internal genre also plays out in “Strung Out” as Erin moves from despising herself to accepting who she is and finding a way to live in the world without dulling her pain with drugs.
???? Once you pinpoint your internal and external genres, then you can look up the Obligatory Scenes for those genres.
There’s quite a bit of overlap in the Obligatory scenes across genres, so you won’t find it difficult to make sure you have all the scenes you need. But there will also be specific scenes that relate only to your story’s genre, too.
For example, stories with the Action external genre must include a life-threatening attack early in the book. Without this scene, there’s no reason for the hero to act.
Stories that have the internal genre of Status portray a change in social position. This can be rags to riches. Or power to loss of power. Some examples are the movies “Rocky” and “Dinner With Schmucks.” All Status stories must have a scene in which the protagonist changes the status quo of their lives — aka their ordinary world — in order to seek fame or fortune.
As you understand more about your genre and the kinds of scenes needed for each, you go back to your notecards and fill in the blanks.
One more step: Using Save the Cat to make a plan for your book
Instinct told me that something was missing from my scene list, but I couldn’t quite pinpoint what it was. I considered doing another set of notecards, but I wasn’t convinced it would add anything new to my process.
Instead, I followed Savannah Gilbo’s 15 Step Save the Cat outlining process.
Save the Cat breaks the arc of a story into 15 discrete steps. Each one serves a role in moving the story forward as it increases the tension and stakes for the characters and plot.
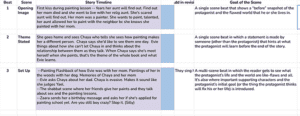
My friend and writing critique partner Jess Evans shared a Save the Cat spreadsheet she created with me. I modified her spreadsheet to fit my story.
It includes
- The number of the beat
- The action and events in my story timeline
- A description of what that beat must include for reference
- A column for notes
Filling in the scenes according to the beat sheet helped me clarify the purpose of each scene. I made sure the scene moved the plot forward. It also showed me what was missing.
In my case, I needed to add a new character in the B-Story beat of Save the Cat. The B-Story is “a single scene beat that introduces a new character or characters who will ultimately serve to help the hero learn the theme (or lesson) of the story.” This occurs at the beginning of the second act of the book where the middle build begins.
It turns out I already had a character I wanted to include in the book but wasn’t sure where to introduce her. Adding a scene with this character in the first third of the book allowed me to create an arc for this character that threads throughout the book instead of just plopping her in at the end.
???? PRO-TIP: Going through these steps will offer ideas and help fill in blanks but none of this is foolproof. You’ll still leave things out and run into complications. There may be ideas you didn’t have a chance to address and pieces of characters that don’t make sense.
Making mistakes and missing steps is totally normal part of the writing process, especially if this is the first time you’re writing a book. Even experienced authors still run into questions as they write, because each book brings new challenges and requires a different organizational and writing process.
When is it time to stop planning your book and start writing?
Planning a book can be a never-ending process — if you let it. You can try all the measures, read all the books and go back to tweak your scenes and characters endlessly. At a certain point, you have to start writing.
With each book you write, you’ll make mistakes, but you’ll also learn something new.
I didn’t plan at all for my first book, and it was a righteous mess. I ended up with 400+ pages of scenes that never really fit together. What I learned from writing this first book is that it doesn’t work for me to fly by the seat of my pants as I write. I prefer to plan.
When I sat down to write my second book, I created a plan following the advice Ann Patchet laid out in “The Getaway Car”. She said she doesn’t write a word until she has the full idea of the book in her head. Because she didn’t mention any particular process where she wrote down her scenes or used note cards, I assumed she literally did this all in her head, so that’s how I created the plan for my first YA novel.
I thought about my main characters and the basics of the story. I knew the beginning and the ending. I realized when I wrote the first draft, though, that I didn’t actually know enough about my characters or my plot to make it through the middle. I wasn’t sure what actions my characters needed to take in order for them to make their way to the wonderful ending I’d planned.
Because of this, my first draft was messy, though nowhere near as sloppy as my first book. The beginning worked because it was clear in my head. After that, things became a bit murkier, so by the time I hit the middle point, I’d lost track of where I was going. My first draft never made it to the end.
That initial draft, however, did create a trajectory for the book as well as lots of scenes that helped me develop the second draft.
“The first draft is just you telling yourself the story,” Terry Pratchett says. That’s what happened with my second fiction novel.
What the first draft of this novel didn’t do was give me a full plot with fleshed-out characters. That’s ok because you can do all of these things along the way of writing your draft, second or third or any of them. The writing process is easier when you’ve planned it out prior to writing.
I followed a more detailed process for my second YA book using the Story Grid and Save the Cat tools. I fleshed out my characters and their arcs using story sheets and questions. I wrote a clean logline and created a solid outline for my book.
When I sat down to write my book on the first day of November’s National Novel Writing Month, I was amazed at how quickly I was able to write. Because I’d laid out my story and knew what needed to be in each scene, I was able to write down the bones of each scene before moving on to the next. I completed the full first draft in less than thirty days.
???? PRO-TIP: I don’t write fast by accident. When I started writing my first YA novel, I used the opportunity to create a solid writing practice. I started writing no more than five pages a week, and by the end of the year, I could easily write fifty pages a week.
Building my writing muscles while I wrote a novel and then maintaining as I wrote two more nonfiction books, are what allowed me to finish the draft of my second YA fiction novel in less than a month.
???? PRO-TIP: You don’t have to write every day in order to do this. Instead, you can set a schedule for your writing and then challenge yourself to stick to it.
Writing a shitty first draft based on your plan
When I sat down to write my book based on the plan I’d created, I wrote without editing. Instead, I wrote the book from beginning to end.
It’s hard to let go and let the writing flow. You’ll be tempted to go back and edit scenes, but it’s best not to edit until you’ve finished a full draft, however chaotic that first one may seem.
What do you gain when you write the full draft without editing?
Writing from beginning to end allows you to see recurring imagery from the beginning of the book to the end. When it’s time to go back to edit, you’ll be able to highlight them and make conscious choices about how they change over the course of the book.
Writing a full draft also gives your words time to marinate. Even when you’re not writing, you give yourself time to process your ideas. You’re creating in between the words.
The ups and downs of the process of planning a book
Some days, your writing will flow like the wind. Other days, the process might feel stilted and boring. You’ll repeat the same ideas over and over. Or you’ll write in circles, never getting to the point of what you want to say.
This is what it feels like to write a rough draft. It’s uncomfortable and you won’t answer all your questions. Your draft will be ugly and pieces won’t fit together. Stay with it because once you’ve completed your rough draft, then you can begin to edit.
That’s when the magic happens.
The biggest takeaway from all of this is for you to trust your instinct. You know what needs to be in your book better than anyone else. Use the tools that make sense to you and use them in the order that fits your writing process. Yes, you’ll make mistakes along the way, but after twenty years working with writers, there are two things I’ve learned without a doubt. First, you can trust yourself and your instinct to plan your book and write it. And second, as long as you keep going, you will finish.